

If you want to see the complete tutorial, please visit IR Repeater Tutorial Part 1 first.
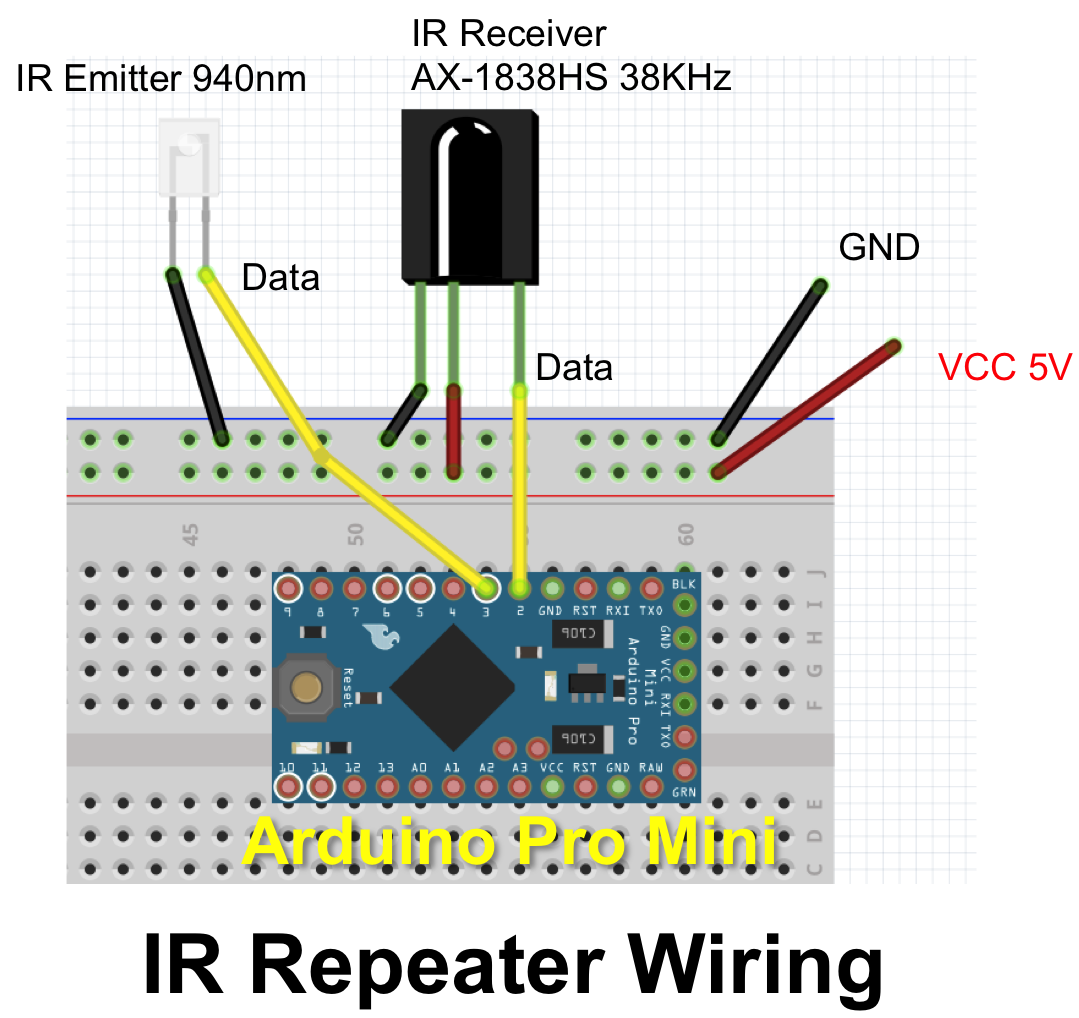
Test out everything on the proton board:
It’s always a good practice to test out the wiring before solder components together.
Connect IR receiver LED to Arduino Pro Mini

Connect IR emitter LED through 100 Ohm resister

The program below was created by Lauszus that I found on Gighub. The original program was written to receive IR code and decode IR then save the IR code in the memory until a button is pressed to emit IR code. To meet my requirement, I made few modifications to make it receive IR, decode IR, and then emit the IR immediately. Here is my code:
[Programming code]
/*
 * IRrecord: record and play back IR signals as a minimal
 * An IR detector/demodulator must be connected to the input RECV_PIN.
 * An IR LED must be connected to the output PWM pin 3.
 * A button must be connected to the input BUTTON_PIN; this is the
 * send button.
 * A visible LED can be connected to STATUS_PIN to provide status.
 *
 * The logic is:
 * If the button is pressed, send the IR code.
 * If an IR code is received, record it.
 *
 * Version 0.11 September, 2009
 * Copyright 2009 Ken Shirriff
 * http://arcfn.com
 *
 *
 * Version 0.2 October, 2015
 * Modified to remove button function
 * This module acts a IR Repeater to just
 * "Read the IR Code " and "Send the IR Code" immediately
 * By En-Lin Chen / Stonez56
 *
 */

#include <IRremote.h>

int RECV_PIN = 2;
int STATUS_PIN = 13;

IRrecv irrecv(RECV_PIN);
IRsend irsend;

decode_results results;

void setup()
{
  Serial.begin(9600);
  irrecv.enableIRIn(); // Start the receiver
  pinMode(STATUS_PIN, OUTPUT);
}

// Storage for the recorded code
int codeType = -1; // The type of code
unsigned long codeValue; // The code value if not raw
unsigned int rawCodes[RAWBUF]; // The durations if raw
int codeLen; // The length of the code
int toggle = 0; // The RC5/6 toggle state

// Stores the code for later playback
// Most of this code is just logging
void storeCode(decode_results *results) {
  codeType = results->decode_type;
  int count = results->rawlen;
  if (codeType == UNKNOWN) {
    Serial.println("Received unknown code, saving as raw");
    codeLen = results->rawlen - 1;
    // To store raw codes:
    // Drop first value (gap)
    // Convert from ticks to microseconds
    // Tweak marks shorter, and spaces longer to cancel out IR receiver distortion
    for (int i = 1; i <= codeLen; i++) {
      if (i % 2) {
        // Mark
        rawCodes[i - 1] = results->rawbuf[i]*USECPERTICK - MARK_EXCESS;
        Serial.print(" m");
      }
      else {
        // Space
        rawCodes[i - 1] = results->rawbuf[i]*USECPERTICK + MARK_EXCESS;
        Serial.print(" s");
      }
      Serial.print(rawCodes[i - 1], DEC);
    }
    Serial.println("");
  }
  else {
    if (codeType == NEC) {
      Serial.print("Received NEC: ");
    }
    else if (codeType == SONY) {
      Serial.print("Received SONY: ");
    }
    else if (codeType == RC5) {
      Serial.print("Received RC5: ");
    }
    else if (codeType == RC6) {
      Serial.print("Received RC6: ");
    }
    else {
      Serial.print("Unexpected codeType ");
      Serial.print(codeType, DEC);
      Serial.println("");
    }
    Serial.println(results->value, HEX);
    codeValue = results->value;
    codeLen = results->bits;
  }
}

void sendCode(int repeat) {
  if(codeValue == 0xFFFFFFFF) return;  //ignore FFFFFFF IR code
  if (codeType == NEC) {
      irsend.sendNEC(codeValue, codeLen);
      Serial.print("Sent NEC ");
      Serial.println(codeValue, HEX);
  }
  else if (codeType == SONY) {
    irsend.sendSony(codeValue, codeLen);
    Serial.print("Sent Sony ");
    Serial.println(codeValue, HEX);
  }
  else if (codeType == RC5 || codeType == RC6) {
    if (!repeat) {
      // Flip the toggle bit for a new button press
      toggle = 1 - toggle;
    }
    // Put the toggle bit into the code to send
    codeValue = codeValue & ~(1 << (codeLen - 1));
    codeValue = codeValue | (toggle << (codeLen - 1));
    if (codeType == RC5) {
      Serial.print("Sent RC5 ");
      Serial.println(codeValue, HEX);
      irsend.sendRC5(codeValue, codeLen);
    }
    else {
      irsend.sendRC6(codeValue, codeLen);
      Serial.print("Sent RC6 ");
      Serial.println(codeValue, HEX);
    }
  }
  else if (codeType == UNKNOWN /* i.e. raw */) {
    // Assume 38 KHz
    irsend.sendRaw(rawCodes, codeLen, 38);
    Serial.println("Sent raw");
  }
}


void loop() {

  if (irrecv.decode(&results)) {
    /* Receive IR code */
    Serial.println("Pressed!");
    digitalWrite(STATUS_PIN, HIGH);
    storeCode(&results);
    irrecv.resume(); // resume receiver
    digitalWrite(STATUS_PIN, LOW);
    delay(50);

    /* Send IR code */
    Serial.println("Sending!");
    digitalWrite(STATUS_PIN, HIGH);
    sendCode(true);
    digitalWrite(STATUS_PIN, LOW);
    delay(50); // Wait a bit between retransmissions
    irrecv.enableIRIn(); // Re-start the receiver
    Serial.println("--------------------------------");
  }
}
After programming code is copied into Arduino IDE, upload it to your Arduino Pro Mini.
Power it up and then use any remote control to point to IR receiver and observe the Arduino IDE Serial output screen. Turn on Serial Monitor: Arduino -> Tools->Serial Monitor

Here shows you the IR command received through the serial port monitor.
Received NFC: FFA252D (Remote type is NEC, and the code is 0xFFA25D)
Sent NEC: FFA25D

After fully tested, it’s time to solder everything together.
First, solder IR emitter LED to the extended long wires. Although not showing at the photo below, an 100 Omh resistor is needed on the data pin 2.

I soldered the IR receiver LED on small proton board to allow me to fix it into the IR BOX easier.
To provide constant power, I decided to use a smart phone power adaptor through a USB connector.

There are 4 tiny wires in the USB cable and you only need black and red wire to supply power to Arduino Pro Mini. Red connects to VCC and Black connects to Ground.

I’ve chosen to use a name card case as the enclosure. I drilled a tiny hole in the front of the name card case (see below), to expose IR receiver LED towards the edge.

Too often, accidentally pulling the wires will break the soldering part, so I tight a knot on the extended long wires to secure wires in place.

Now, every parts are soldered together as you see below.

Emitter board and Arduino Pro Mini placement is looked like this below.

Then, I glue the entire board with a glue gun to secure PCBs inside the name card box.

Plug the USB adaptor to power it up. Great! It’s working.

Below is how this project looked like. As you can see, the extended wires are almost five to seven meters long.

Setup:
Follow IR Repeater Setup Illustration in Tutorial Part 1
- Place IR BOX next to your TV and plug the USB adapter
- Pull the IR emitter with the wire through the wall into the living room
- Make sure the IR emitter is aiming towards the IR receiver on the Set Top Box
- I glue the IR emitter LED next to my couch and it working fine
- Done
After the setup, I’ve been use this IR repeater for 2~3 weeks and it’s working perfectly without any issue. If you would like to make your own, you can follow this tutorial!
See the video below, if you haven’t!
END.
==================================================
如果你要閱讀完整的教學,請參考第一篇教學。
在洞洞板上試著做做看:
把所有電子零件都焊起來之前,我們最好利用洞洞板來測試一下,可以正常運作後才做焊接。請參考上圖,先用跳線把紅外線接收LED連線到 Arduino Pro Mini。
連接100歐姆電阻到紅外線發射 LED 正極
簡單的連線後,大致就完成了。接下來把下面的程式碼上傳到 Arduino 。
[程式碼請參考英文版內文]
上方的程式碼的原作者是 Lauszus (Github) ,此程式原本是要接受到紅外線解碼後,儲存在記憶體中,在使用者按下一個按鈕後才由紅外線發射 LED 發射出訊號。
為了符合這個 IR BOX 的需求,我做了一些修改,讓它收到後直接發射出紅外線編碼。
接上 5V 電源,利用 MOD 的搖控器對準 IR 接收LED。你可以在 Arduino IDE 的 Serial Monitor 上觀查 IR BOX 接收與傳出 IR Code 的資料。
打開 Serial Monitor 的方式: Arduino -> Tools->Serial Monitor 參考下圖:
Received NFC: FFA252D (Remote type is NEC, and the code is 0xFFA25D)
(IR 接收解碼為:FFA252D 搖控器類型 NEC)
(IR 發射碼)Sent NEC: FFA25D
一切測試無誤後,可以開始動手把零件焊在一起。
先把 IR 發射 LED 焊到加長的電線上,別忘了在 LED 資料前焊上一個 100 歐姆的電阻(我底下的照片沒有這個電阻)。這個 IR 發射 LED 和兩條 7.5 公尺的電線就是要穿過牆放到到客廳裡。
我把 IR 接收 LED 焊在一塊洞洞板上,這樣可以讓 IR LED 固定的更好。
這個模組需要一個 5V 的電源長期供電才能運作,所以我找來一個手機的 5V 充電器來供電。
先把 USB 電源線剪一小段並剝去外面包覆的絕緣層。裡面有四條電線,我們只需要把紅色的焊接到 Arduino 正極(VCC),黑色的焊接到 Arduino 負極(GND),再把 USB 插到手機充電插頭即可以供電。
手上臨時找到了一個名片盒,就拿它來當做 IR BOX 的外殻吧!(好…我承認它不太美觀 …Orz..)先在名片盒的側面鑽個小孔,只要讓 IR 接收 LED 可以外露出來,接受紅外訊號即可;如下圖:
接著,把延長的電線穿到名片盒後打上一個結固定好,以避免不小心拉扯電線時,把焊點拔斷了!
再接著,把電源焊到Arduino Pro Mini,並把線路依圖示都焊上。
再把焊有紅外接收 LED 的洞洞皮放到名片盒裡試試看那個位置合適。
確定 IR LED 有露出到剛剛鑽孔的位置,再把Arduino Pro Mini 位置確定後,用很多的膠固定電路板的位置;如下:
接上 USB 電源後紅色 LED 亮起,表示 IR BOX 已正常的運作了,太好了!
我做的 IR BOX(紅外線轉發器)整個看起來就像下面一樣。IR BOX 連著長長的電線(7.5公尺),電線的尾端則是 IR 發射LED 。
安裝:
依照教學的 Part 1 紅外線轉發器安裝方法圖示:
- 把 IR BOX 放在房間適當位置固定並插入電源
- 把長長的電源線和 IR 發射LED 穿過牆壁,
- 確認IR 發射LED 拉到能正對著機上盒的紅外接收位置 (Set Top Box)
- 我用膠槍把 IR LED 固定在沙發旁邊。
- 完成
安裝好後,我已經用了兩三個星期了,而且整個 IR 轉發器運作都很順利。
如果你也想要自己 DIY 一個話,可以自己開始動手了!!
如果你還沒有看過實際運作的影片,請按底下播放。
全文完.


Hi Nikhil B,
I just found the include function does not carry the remote library name.
Please replace:
#include
with
#include <IRremote.h>
Interesting idea! However, most of tablets do not have IR built-in.
How about check the most recent IR Rremote.h library to see if that could help.
https://github.com/z3t0/Arduino-IRremote