

I have been attracted to Arduino POV[1] for quite a while, but I didn’t have a chance to actually make it myself. Luckily, I found this easy to follow Arduino POV tutorial[2] on Instructable.com and within an hour, my son and me made two Arduino POV sets and have fun for the entire afternoon.
Material needed for this tutorial:
- Arduino Nano * 1 (All other kinds of Arduino board will do)
- LED * 7
- 220 resistor * 7
- Jump wire ~ up to 10 (female to male)
- Prefboard * 1
- Battery pack (If you would like have fun without tethered with USB)
Easy Wire Connection as follow:
- LED1 ~ LED7 negative pin to Prefboard GND
- Prefboard to Nano(or Uno) GND pin
- LED1 ~ LED7 postive pin to Nano(or Uno) D2 ~ D8 pin
- USB power to Nano USB port to supply power (or use a battery back to supply power)
Schematic: (I use www.tinkercad.com to draw this schematic below, just in case you interested.)


As you can see in the picture below, I’v used Arduino Nano. It’s lighter and smaller for portable devices. I made the Red one and my son have choose the Green.

Programming logic:
When anyone sees an image, the image stays in the retina of the eyes for roughly 1/16th seconds. We can utilize the particular physical characteristic of human eyes, to crate the Arduino POV project. The basic idea is when we want to show a letter, Arduino shows each column of a letter at a time to form the letter to eyes.
See the illustration below on how to show a letter ‘H’. First, Arduino displays column 1 to light up all 7 LEDs at timing 1. While column 1 image stays in human eyes, Arduino shows 2nd column, then 3, 4, and 5th columns at their respectively timing 2~5. Since all these images stays in human eyes temporarily, we will see the letter ‘H’.

Actual LED image captured:

Arduino code here:
Just copy and past into Arduino IDE and it should work.
*Change your own message in the variable msgBody and remember to change msgLength*
/*
 Written by Ahmad Saeed on 22 August 2015

 This code is capable of displaying the following characters;
 0123456789ABCDEFGHIJKLMNOPQRSTUVWXYZ .-_!%&#$,()@?
*/

//////////////////// Message to Customize  ///////////////////
#define msgLength 11                                       ///
String msgBody = "This is POV";                            ///
//////////////////////////////////////////////////////////////
//////////////////////////////////////////////////////////////


#define delayInChar 3
#define delayBetweenChar 5
#define LED1 2
#define LED2 3
#define LED3 4
#define LED4 5
#define LED5 6
#define LED6 7
#define LED7 8

byte msgCode[(5 * msgLength) + 10];
boolean pintState;
int columnNum = -1;
String charToWrite;

void setup() {
  msgBody.toUpperCase();
  pinMode(LED1, OUTPUT);
  pinMode(LED2, OUTPUT);
  pinMode(LED3, OUTPUT);
  pinMode(LED4, OUTPUT);
  pinMode(LED5, OUTPUT);
  pinMode(LED6, OUTPUT);
  pinMode(LED7, OUTPUT);
}

void loop() {
//// Convert all text to binary array ////////////////////////
  if ( columnNum == -1 ) // This block needs to be done once//
  {                                                         //
    for (int c = 0; c < (msgBody.length()); c++)  {         //
      //Separate the following character                    //
      charToWrite = msgBody.substring(c, c + 1);            //
      //Send the separated characted to addChar function    //
      addChar(charToWrite);                                 //
    }                                                       //
      //Add a little space after each character             //
    addChar(" ");                                           //
    addChar(" ");                                           //
  }                                                         //
//////////////////////////////////////////////////////////////

//// Display the binary arrays after all characters are coded //
  for (int c = 0; c < (sizeof(msgCode)); c++)  {              //
    pintState = (msgCode[c] / B1000000) % B10;                //
    digitalWrite(LED1, pintState);                            //
                                                              //
    pintState = (msgCode[c] / B100000) % B10;                 //
    digitalWrite(LED2, pintState);                            //
                                                              //
    pintState = (msgCode[c] / B10000) % B10;                  //
    digitalWrite(LED3, pintState);                            //
                                                              //
    pintState = (msgCode[c] / B1000) % B10;                   //
    digitalWrite(LED4, pintState);                            //
                                                              //
    pintState = (msgCode[c] / B100) % B10;                    //
    digitalWrite(LED5, pintState);                            //
                                                              //
    pintState = (msgCode[c] / B10) % B10;                     //
    digitalWrite(LED6, pintState);                            //
                                                              //
    pintState = msgCode[c] % B10;;                            //
    digitalWrite(LED7, pintState);                            //
                                                              //
    delay(delayInChar);                                       //
    // if the character is finished, take a longer off period //
    if ((c + 1) % 5 == 0 ) {                                  //
      digitalWrite(LED1, LOW);                                //
      digitalWrite(LED2, LOW);                                //
      digitalWrite(LED3, LOW);                                //
      digitalWrite(LED4, LOW);                                //
      digitalWrite(LED5, LOW);                                //
      digitalWrite(LED6, LOW);                                //
      digitalWrite(LED7, LOW);                                //
      delay(delayBetweenChar);                                //
    }                                                         //
  }                                                           //
                                                              //
////////////////////////////////////////////////////////////////
}


void addChar(String y) {
  if (y == "1") {
    addColumn(B0010001);
    addColumn(B0100001);
    addColumn(B1111111);
    addColumn(B0000001);
    addColumn(B0000001);
  }
  else if (y == "2") {
    addColumn(B0100001);
    addColumn(B1000011);
    addColumn(B1000101);
    addColumn(B1001001);
    addColumn(B0110001);
  }
  else if (y == "3") {
    addColumn(B0100010);
    addColumn(B1000001);
    addColumn(B1001001);
    addColumn(B1001001);
    addColumn(B0110110);
  }
  else if (y == "4") {
    addColumn(B0001100);
    addColumn(B0010100);
    addColumn(B0100100);
    addColumn(B1111111);
    addColumn(B0000100);
  }
  else if (y == "5") {
    addColumn(B1110010);
    addColumn(B1010001);
    addColumn(B1010001);
    addColumn(B1010001);
    addColumn(B1001110);
  }
  else if (y == "6") {
    addColumn(B0111110);
    addColumn(B1001001);
    addColumn(B1001001);
    addColumn(B1001001);
    addColumn(B0100110);
  }
  else if (y == "7") {
    addColumn(B1000000);
    addColumn(B1000111);
    addColumn(B1001000);
    addColumn(B1010000);
    addColumn(B1100000);
  }
  else if (y == "8") {
    addColumn(B0110110);
    addColumn(B1001001);
    addColumn(B1001001);
    addColumn(B1001001);
    addColumn(B0110110);
  }
  else if (y == "9") {
    addColumn(B0110010);
    addColumn(B1001001);
    addColumn(B1001001);
    addColumn(B1001001);
    addColumn(B0111110);
  }
  else if (y == "0") {
    addColumn(B0111110);
    addColumn(B1000101);
    addColumn(B1001001);
    addColumn(B1010001);
    addColumn(B0111110);
  }
  else if (y == "A") {
    addColumn(B0011111);
    addColumn(B0100100);
    addColumn(B1000100);
    addColumn(B1000100);
    addColumn(B1111111);
  }
  else if (y == "B") {
    addColumn(B1111111);
    addColumn(B1001001);
    addColumn(B1001001);
    addColumn(B1001001);
    addColumn(B0110110);
  }
  else if (y == "C") {
    addColumn(B0111110);
    addColumn(B1000001);
    addColumn(B1000001);
    addColumn(B1000001);
    addColumn(B0100010);
  }
  else if (y == "D") {
    addColumn(B1111111);
    addColumn(B1000001);
    addColumn(B1000001);
    addColumn(B1000001);
    addColumn(B0111110);
  }
  else if (y == "E") {
    addColumn(B1111111);
    addColumn(B1001001);
    addColumn(B1001001);
    addColumn(B1001001);
    addColumn(B1000001);
  }
  else if (y == "F") {
    addColumn(B1111111);
    addColumn(B1001000);
    addColumn(B1001000);
    addColumn(B1001000);
    addColumn(B1000000);
  }
  else if (y == "G") {
    addColumn(B0111110);
    addColumn(B1000001);
    addColumn(B1000001);
    addColumn(B1000101);
    addColumn(B0100110);
  }
  else if (y == "H") {
    addColumn(B1111111);
    addColumn(B0001000);
    addColumn(B0001000);
    addColumn(B0001000);
    addColumn(B1111111);
  }
  else if (y == "I") {
    addColumn(B0000000);
    addColumn(B1000001);
    addColumn(B1111111);
    addColumn(B1000001);
    addColumn(B0000000);
  }
  else if (y == "J") {
    addColumn(B0000000);
    addColumn(B0000010);
    addColumn(B1000001);
    addColumn(B1000001);
    addColumn(B1111110);
  }
  else if (y == "K") {
    addColumn(B1111111);
    addColumn(B0001000);
    addColumn(B0010100);
    addColumn(B0100010);
    addColumn(B1000001);
  }
  else if (y == "L") {
    addColumn(B1111111);
    addColumn(B0000001);
    addColumn(B0000001);
    addColumn(B0000001);
    addColumn(B0000001);
  }
  else if (y == "M") {
    addColumn(B1111111);
    addColumn(B0100000);
    addColumn(B0011000);
    addColumn(B0100000);
    addColumn(B1111111);
  }
  else if (y == "N") {
    addColumn(B1111111);
    addColumn(B0010000);
    addColumn(B0001000);
    addColumn(B0000100);
    addColumn(B1111111);
  }
  else if (y == "O") {
    addColumn(B0111110);
    addColumn(B1000001);
    addColumn(B1000001);
    addColumn(B1000001);
    addColumn(B0111110);
  }
  else if (y == "P") {
    addColumn(B1111111);
    addColumn(B1001000);
    addColumn(B1001000);
    addColumn(B1001000);
    addColumn(B0110000);
  }
  else if (y == "Q") {
    addColumn(B0111100);
    addColumn(B1000010);
    addColumn(B1000010);
    addColumn(B1000010);
    addColumn(B0111101);
  }
  else if (y == "R") {
    addColumn(B1111111);
    addColumn(B1001000);
    addColumn(B1001100);
    addColumn(B1001010);
    addColumn(B0110001);
  }
  else if (y == "S") {
    addColumn(B0110010);
    addColumn(B1001001);
    addColumn(B1001001);
    addColumn(B1001001);
    addColumn(B0100110);
  }
  else if (y == "T") {
    addColumn(B1000000);
    addColumn(B1000000);
    addColumn(B1111111);
    addColumn(B1000000);
    addColumn(B1000000);
  }
  else if (y == "U") {
    addColumn(B1111110);
    addColumn(B0000001);
    addColumn(B0000001);
    addColumn(B0000001);
    addColumn(B1111110);
  }
  else if (y == "V") {
    addColumn(B1111100);
    addColumn(B0000010);
    addColumn(B0000001);
    addColumn(B0000010);
    addColumn(B1111100);
  }
  else if (y == "W") {
    addColumn(B1111110);
    addColumn(B0000001);
    addColumn(B0000110);
    addColumn(B0000001);
    addColumn(B1111110);
  }
  else if (y == "X") {
    addColumn(B1100011);
    addColumn(B0010100);
    addColumn(B0001000);
    addColumn(B0010100);
    addColumn(B1100011);
  }
  else if (y == "Y") {
    addColumn(B1110000);
    addColumn(B0001000);
    addColumn(B0001111);
    addColumn(B0001000);
    addColumn(B1110000);
  }
  else if (y == "Z") {
    addColumn(B1000011);
    addColumn(B1000101);
    addColumn(B1001001);
    addColumn(B1010001);
    addColumn(B1000011);
  }
  else if (y == "Z") {
    addColumn(B1000011);
    addColumn(B1000101);
    addColumn(B1001001);
    addColumn(B1010001);
    addColumn(B1000011);
  }
  else if (y == " ") {
    addColumn(B0000000);
    addColumn(B0000000);
    addColumn(B0000000);
    addColumn(B0000000);
    addColumn(B0000000);
  }
  else if (y == ".") {
    addColumn(B0000000);
    addColumn(B0000011);
    addColumn(B0000011);
    addColumn(B0000000);
    addColumn(B0000000);
  }
  else if (y == "_") {
    addColumn(B0000001);
    addColumn(B0000001);
    addColumn(B0000001);
    addColumn(B0000001);
    addColumn(B0000001);
  }
  else if (y == "-") {
    addColumn(B0000000);
    addColumn(B0001000);
    addColumn(B0001000);
    addColumn(B0001000);
    addColumn(B0000000);
  }
  else if (y == "!") {
    addColumn(B0000000);
    addColumn(B0000000);
    addColumn(B1111101);
    addColumn(B0000000);
    addColumn(B0000000);
  }
  else if (y == "(") {
    addColumn(B0000000);
    addColumn(B0000000);
    addColumn(B0000000);
    addColumn(B0111110);
    addColumn(B1000001);
  }
  else if (y == ")") {
    addColumn(B1000001);
    addColumn(B0111110);
    addColumn(B0000000);
    addColumn(B0000000);
    addColumn(B0000000);
  }
  else if (y == "%") {
    addColumn(B1100010);
    addColumn(B1100100);
    addColumn(B0001000);
    addColumn(B0010011);
    addColumn(B0100011);
  }
  else if (y == ",") {
    addColumn(B0000000);
    addColumn(B0000101);
    addColumn(B0000110);
    addColumn(B0000000);
    addColumn(B0000000);
  }
  else if (y == "?") {
    addColumn(B0100000);
    addColumn(B1000101);
    addColumn(B1001000);
    addColumn(B0110000);
    addColumn(B0000000);
  }
  else if (y == "#") {
    addColumn(B0010100);
    addColumn(B0111110);
    addColumn(B0010100);
    addColumn(B0111110);
    addColumn(B0010100);
  }
  else if (y == "@") {
    addColumn(B0111110);
    addColumn(B1000001);
    addColumn(B1011101);
    addColumn(B1011101);
    addColumn(B0111000);
  }
  else if (y == "$") {
    addColumn(B0110010);
    addColumn(B1001001);
    addColumn(B1111111);
    addColumn(B1001001);
    addColumn(B0100110);
  }
}

void addColumn(byte x) {
  columnNum += 1;
  msgCode[columnNum] = (x);
}
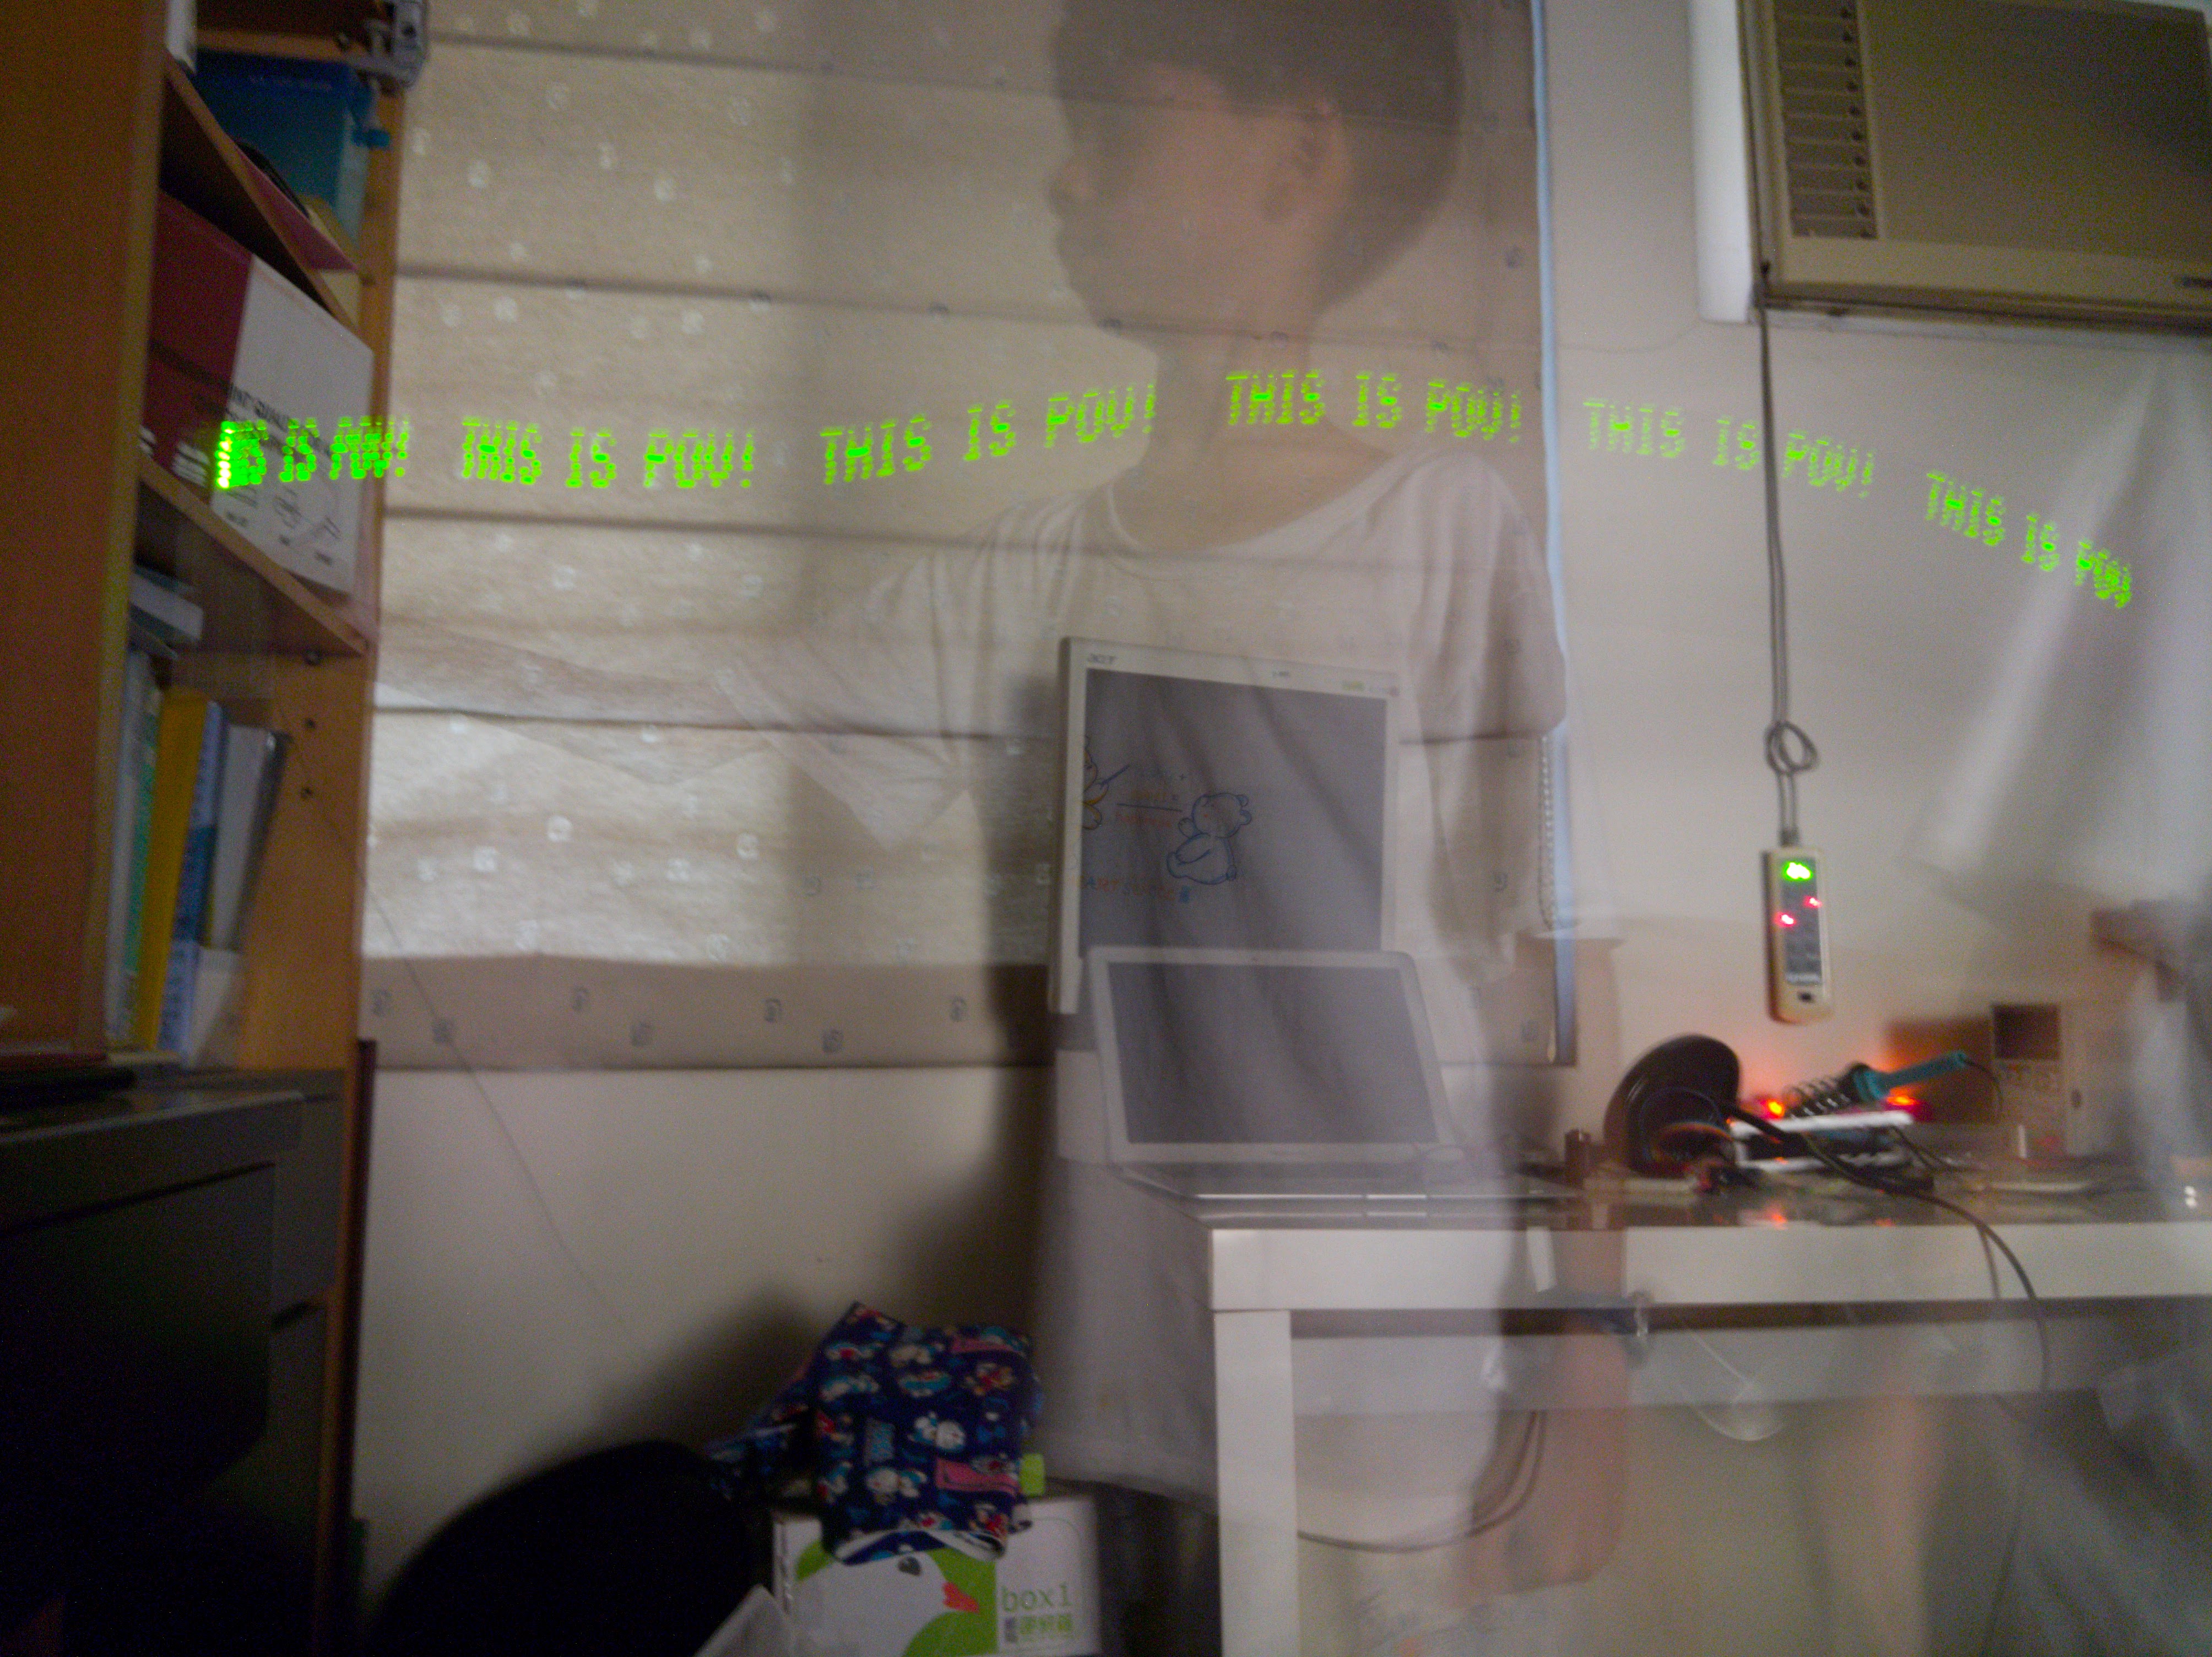
Image captured with my POV set:

Image captured with my son’s POV set:
How to capture the image:
Article feferences:
Done.
==== 中 文 版 本 ====
自從我看個幾個 Arduino POV[1] 專案之後,一直想自己試試做一個來玩玩,但一直有點懶惰,遲遲沒有動手。最近看到一篇很簡單的教學 Arduino POV tutorial[2] ,剛好兒子也在家,我們決定一起動手來做一個來玩。只需約一小時,我們就各自做了一組 Arduino POV,而且整個下午都在試著不同的字串及拿著 HTC U11 拍出很一些有趣的照片。這是一個很好的親子活動的安排哩!現在就看著這篇教學一起動手吧!
這篇教學所需材料:
- Arduino Nano * 1 (Nano, Pro mini, Uno 都可以)
- LED * 7
- 220 歐姆電阻 * 7
- 杜邦線 ~ 約 10條 (母對母)
- 洞洞板 * 1
- 電池盒 (不用連接USB,可以更方便的玩,但可有可無)
接線方式:
- LED1 ~ LED7 負級 to 220 歐姆電阻
- 電阻 to Nano(or Uno) GND
- LED1 ~ LED7 正級 to Nano(or Uno) D2 ~ D8 腳位
- USB 電源接 Nano USB 來提供電源 (這可以用電池盒來取代)
電路圖: (我是用 www.tinkercad.com 來製作這張電路圖)
我這次是使用了 Arduino Nano,因為它的體積比較小。下圖中可以看到我們做了兩組,我做了紅色的這組,我兒子則做了綠色的這一組。
程式的邏輯如下:
原理是當我們看到一個影像時,這個影像會暫留在視網膜上約 1/16 秒。當影像一個接著一個的顯示後,我們即會看到好像是數個影像的重疊,這些重疊的影像看起來就會形成一幅影像;卡通或動畫即是這樣的原理。Arduino POV 就是利用同樣的原理。
看下例如何顯示 H 字母。首先,Arduino 在 Time 1 顯示了欄位 1 的 7 個 LED,然後 Arduino 在 Time 2 ~ 5 個別的顯示欄位 2 ~ 5。 由於每個欄位都會在視網膜上暫留,我們就可以在到字母 ‘H’。
你可以參考這幾個字母放大後的影像如下:
Arduino 程式碼在上方,直接拷貝就可以使用:
*如果你要改變顯示的字串,請記得改變 msgBody 字串以及 msgLength 的字串長度*
下方是我用 HTC U11 照出來的 POV 照片:
這張是用我兒子那一組所拍下來的POV照片。
如何照下 Arduino POV 的照片:
文章參考:



Thank you, unknown!