

Android control color RGB LED using HC-05 Bluetooth with Arduino (Part I)
Part II of this tutorial is here!
This time, I am going to show you how to use Android phone to connect to HC-05 Bluetooth module and Arduino.
Hardware needed:
- Arduino mini pro * 1
- HC-05 Bluetooth module * 1
- RGB LED * 2
- Jump wires * 10
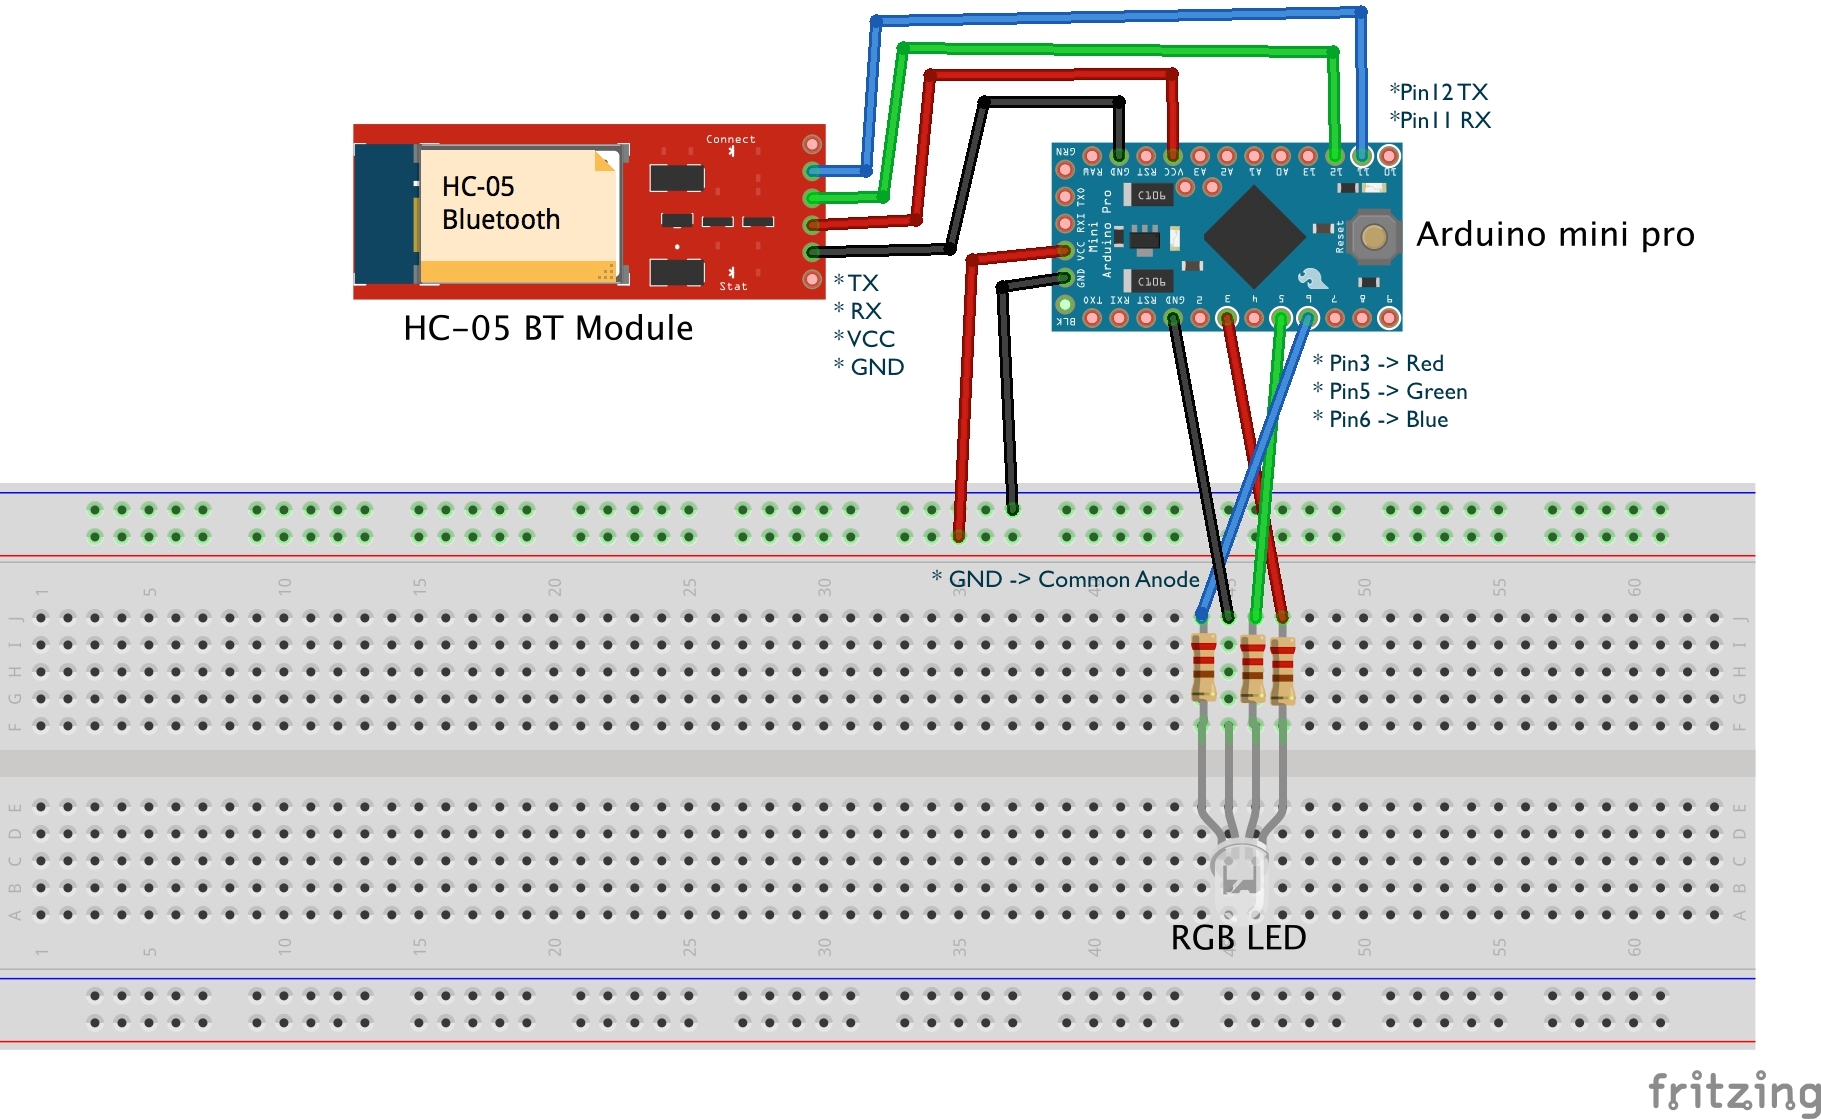
HC-05 Bluetooth Module wiring as follow:
- TX connect to Arduino Pin 11(RX)
- RX connect to Arduino Pin 12(TX)
- Remember to connect TX on the HC-05 to RX on the Arduino and RX on the HC-05 to TX on the Arduino, so Arduino can receive data correctly.
- VCC connect to 5V power
- GND connect to Ground
RGB LED wiring as follow:
Warning: You must connect Arduino mini pro, so your PWM Pin can control LED’s color! For example, Arduino mini pro only has 6 PWM pins and they are 3, 5, 6, 9, 10, and 11, other pins do not have PWM.
- R connect to Arduino Pin 3
- Common Anode connect to 5V
Note: if you bought common anode LED, then this pin must connect to VCC 5V. If you bought common cathode LED, then this pin must connect to GND - G connect to Arduino Pin 5
- B connect to Arduino Pin 6
Arduino wiring as follow:
- GND connect to Ground
- VCC connect to 5V
Look at following chart for the wiring and hardware setup:
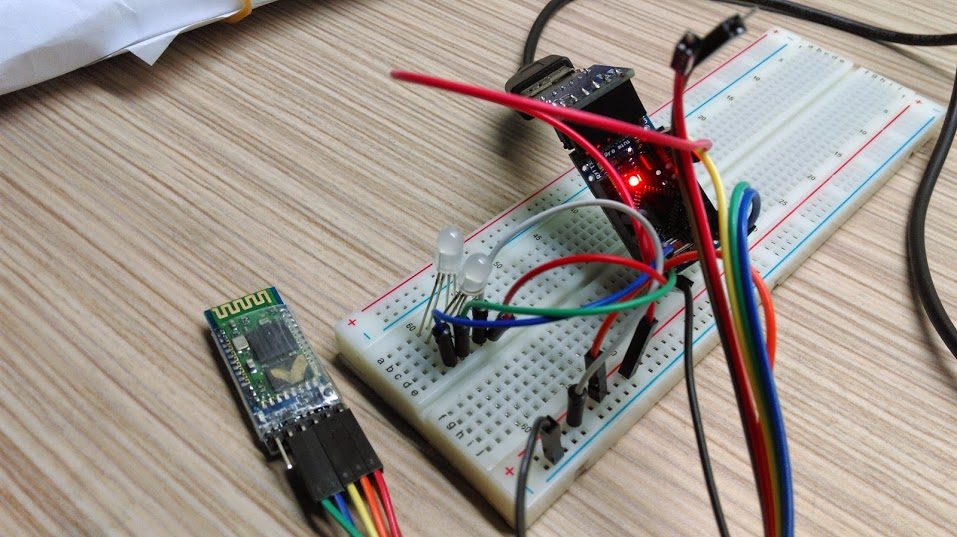
If you connect all the parts together, it
will look like this:
The completed Arduino code is listed here:
#include <Softwareserial.h>
#include <Wire.h>//Include libraries: SoftwareSerial & Wire
SoftwareSerial BT(11,12); //Define PIN11 & PIN12 as RX and TX pins

//RGB LED Pins
int PIN_RED = 3;
int PIN_GREEN = 5;
int PIN_BLUE = 6;
//RED LED at Pin 13
int RED_LED = 13;
String RGB = ""; //store RGB code from BT
String RGB_Previous = "255.255.255)"; //preserve previous RGB color for LED switch on/off, default White
String ON = "ON"; //Check if ON command is received
String OFF = "OFF"; //Check if OFF command is received
boolean RGB_Completed = false;

void setup() {
  Serial.begin(9600); //Arduino serial port baud rate:9600
  BT.begin(9600);//My HC-05 module default baud rate is 9600
  RGB.reserve(30);

  pinMode(RED_LED, OUTPUT);
  //Set pin13 as output for LED,
  // this LED is on Arduino mini pro, not the RGB LED
}

void loop() {
  // put your main code here, to run repeatedly:

  //Read each character from Serial Port(Bluetooth)
  while(BT.available()){
    char ReadChar = (char)BT.read();

    // Right parentheses ) indicates complet of the string
    if(ReadChar == ')'){
      RGB_Completed = true;
    }else{
       RGB += ReadChar;
    }
  }

  //When a command code is received completely with ')' ending character
  if(RGB_Completed){
   //Print out debug info at Serial output window
      Serial.print("RGB:");
      Serial.print(RGB);
      Serial.print("     PreRGB:");
      Serial.println(RGB_Previous);

      if(RGB==ON){
          digitalWrite(13,HIGH);
          RGB = RGB_Previous; //We only receive 'ON', so get previous RGB color back to turn LED on
          Light_RGB_LED();

      }else if(RGB==OFF){
          digitalWrite(13,LOW);
          RGB = "0.0.0)"; //Send OFF string to turn light off
          Light_RGB_LED();
      }else{
          //Turn the color according the color code from Bluetooth Serial Port
          Light_RGB_LED();
          RGB_Previous = RGB;
      }
      //Reset RGB String

      RGB = "";
      RGB_Completed = false;


  } //end if of check if RGB completed

} // end of loop

void Light_RGB_LED(){

  int SP1 = RGB.indexOf('.');
  int SP2 = RGB.indexOf('.', SP1+1);
  int SP3 = RGB.indexOf('.', SP2+1);
  String R = RGB.substring(0, SP1);
  String G = RGB.substring(SP1+1, SP2);
  String B = RGB.substring(SP2+1, SP3);

  //Print out debug info at Serial output window
  Serial.print("R=");
  Serial.println( constrain(R.toInt(),0,255));
  Serial.print("G=");
  Serial.println(constrain(G.toInt(),0,255));
  Serial.print("B=");
  Serial.println( constrain(B.toInt(),0,255));
  //Light up the LED with color code

//**2014-09-21
//Because these RGB LED are common anode (Common positive)
//So we need to take 255 to minus R,G,B value to get correct RGB color code
  analogWrite(PIN_RED,  (255-R.toInt()));
  analogWrite(PIN_GREEN, (255-G.toInt()));
  analogWrite(PIN_BLUE,  (255-B.toInt()));

}
You need to go to Google Play Store and download “BT LED Controller”; you need to use it with this tutorial. You may download APP here
This is what Android BT LED Controller App can do:
1. Connect to Bluetooth
2. Wireless control LED on/off
3. Wireless control LED to change the color
The screen of Android APP is below and you can use it easily:
- Click the ”BT-List” button (The red dot next to it means BT not connected)
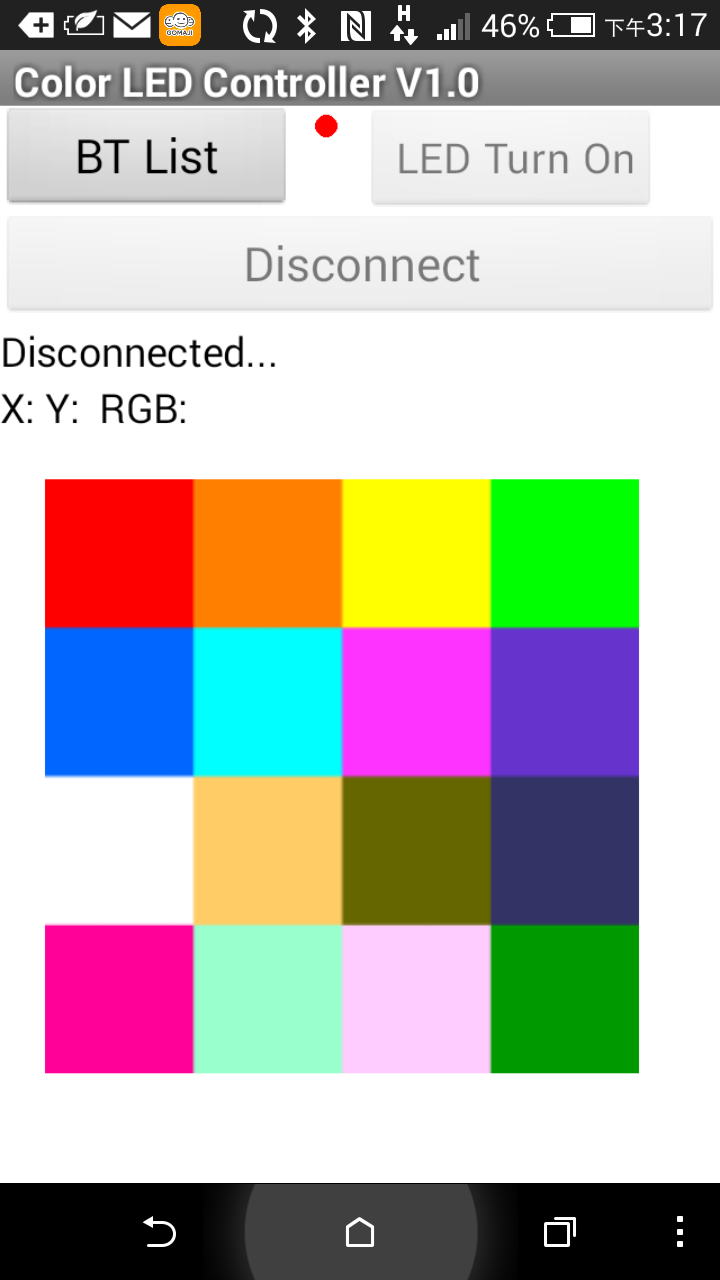
- Next select the Bluetooth you want to connect from the list, after it connected successfully, the APP will jump back to the main screen
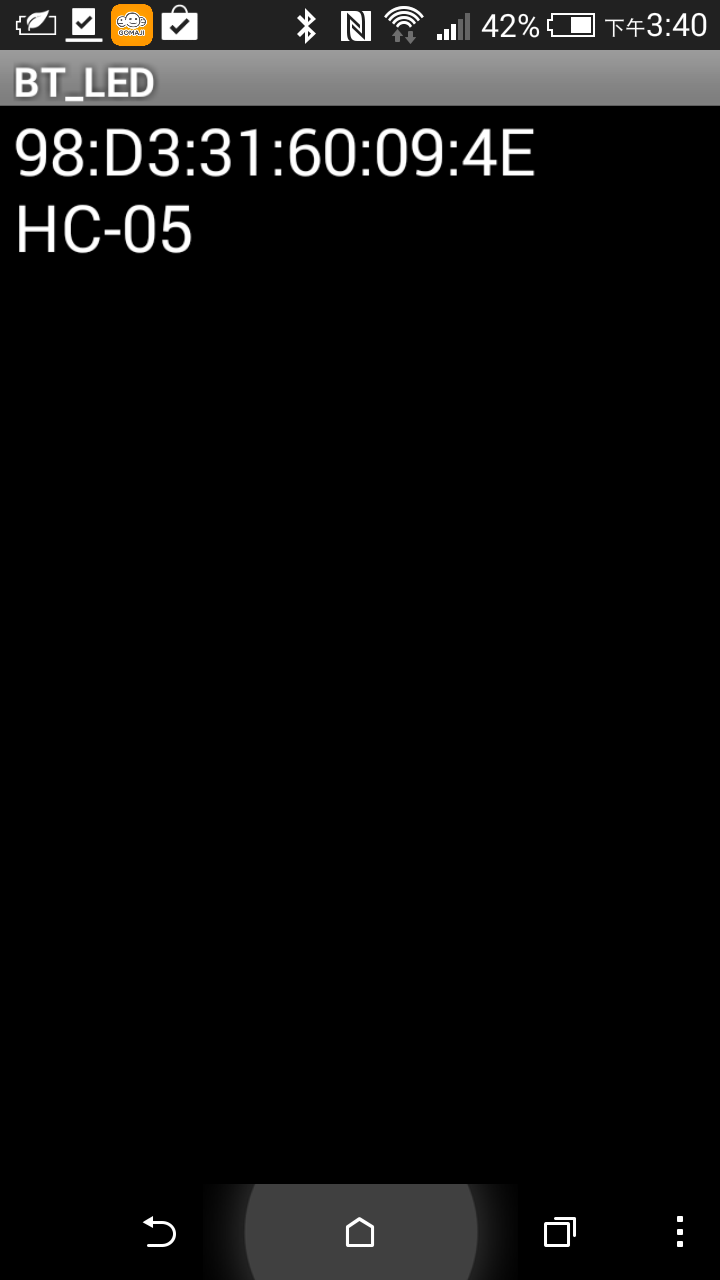
- On the main screen says BT connected (The green dot indicates BT connected)
- Click LED on / LED off button, you can turn LED on/off
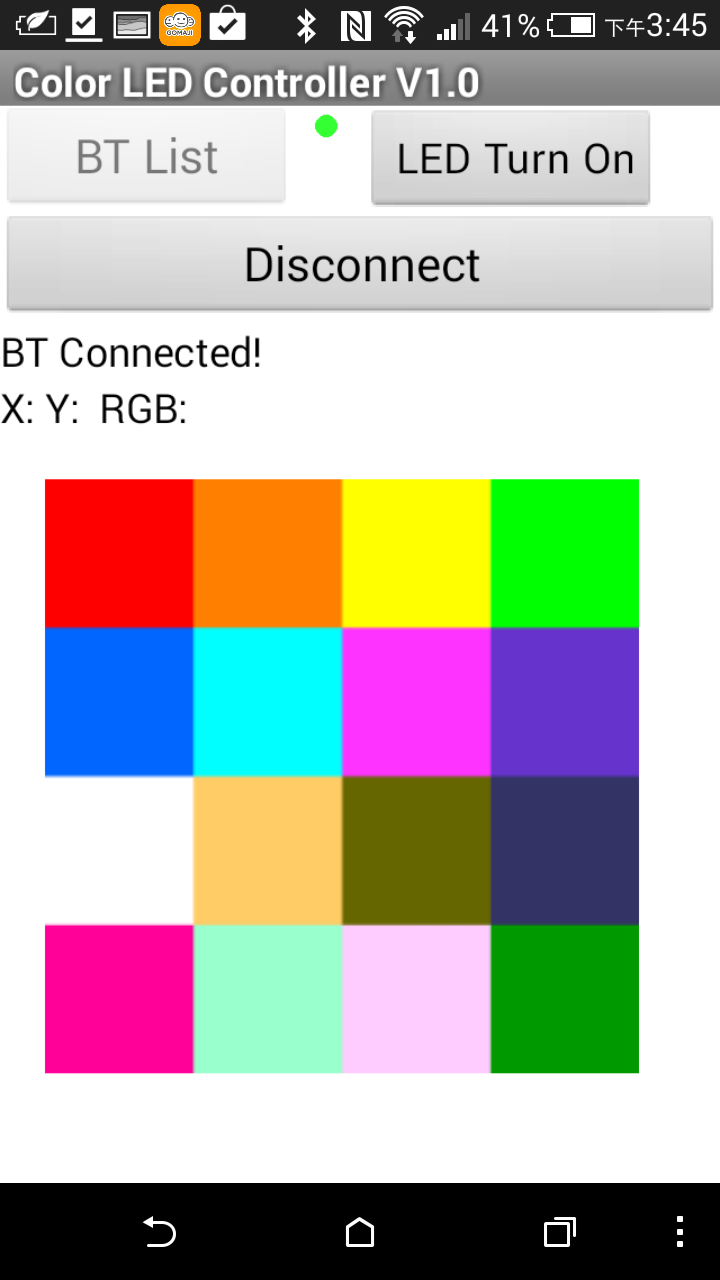
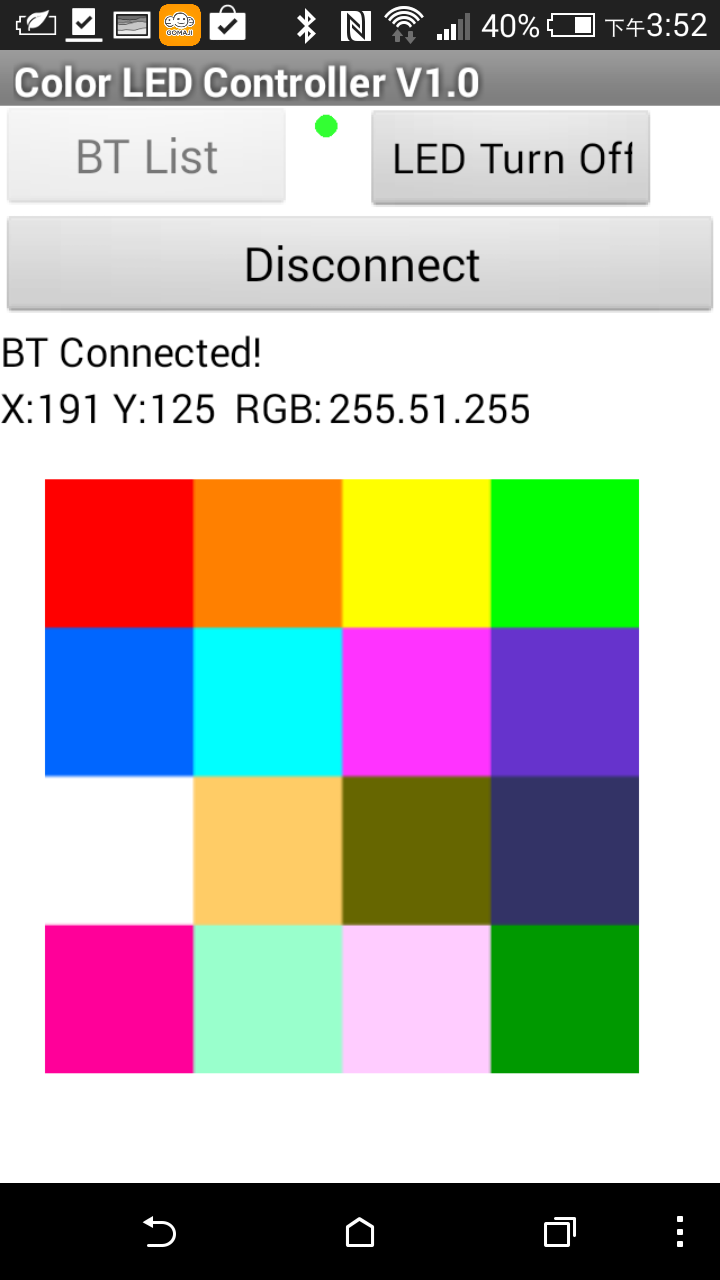
- Click any color block on the App, the RGB color code will be sent to HC-05 and HC-05 will send the RGB color code to Arduino. RGB code is composed 3 numbers of 1~255 with “)” as the ending character, such as “255.20.10)”. Arduino receives a character at a time from the serial port and it combines all characters together. When a “)” is received, the RGB code is completed.
- Arduino then decompose RGB code string into 3 sets of numbers for R, G, B, and then send the code to RGB LED to display the color indicated.
- As shown below (RGB code 255.51.255 will make RGB LED to show magenta)
- Click Disconnect to cut the connection between Android and Arduino.
the video below:
Android 藍芽連線控制彩色 RGB LED (Part I)
本次教學將如何用 Android 程式以藍芽方式連線到HC-05藍芽模組及Arduino.
- Arduino mini pro * 1
- HC-05 Bluetooth module * 1
- RGB LED * 2
- Jump wires * 10
HC-05 Module 接法:
- TX接到 Arduino Pin 11 (RX)
- RX接到 Arduino Pin 12 (TX)
就是發射端與接收端要反接到Arduino, 這樣 Arduino 才收的到訊號 - VCC 接 5V 電源
- GND 接地
RGB LED 接法:
- R 接 Arduino Pin 3
- Common Anode 接 5V
(我買的是共陽的 LED, 所以這支腳要接 5V,若你買的是共陰的 Cathode, 則要接 GND) - G 接 Arduino Pin 5
- B 接 Arduino Pin 6
Arduino 接法:
- GND 接地
- VCC 接 5V
我把這些材料通通接好如下:
Arduino 的程式碼請參考上方!
請由 Google Play Store 下載 BT_LED_Controller V1.0 與這個程式搭配這個教學使用.
由此下載 APP
Android BT_LED_Controller V1.0 有下列功能:
- 藍芽連線
- 無線遙控 LED 開/關
- 無線遙控 LED 改變它的顏色
- 點選上方 “BT-LIST” 鈕 (右方的小紅點表示藍芽尚未連線)
- 主畫面上顯示 BT Connected (小綠點表示已藍芽連線成功)
- 按下 LED Turn on / LED Turn Off 可以打開/關閉 LED
- 點選 App 上的任一顏色方塊,App 會把那個方塊的 RGB code 送到 HC-05,再由 HC-05傳給 Arduino, RGB code 由3組 1~255的數字組成, 再加上右括號尚作是結束符號, 如 255.20.10), 當 Arduino 由 serial port 一個字元一個字元接收, 一直收到 ) 時,才當作是一個完整的 RGB code。
- Arduino 把 RGB code 字串解析後,再送給 RGB LED 顯示指定的顏色
如下圖 (RGB code: 255.51.255 會傳到到 Arduino 顯示出紫紅色) - 點選 Disconnect 則關閉 Android 和 Arduino 的連線
- 完成測試



Hi Melkor,
Do you mean pass colour code in Hex code? It should be okay. However, I understand what's RRRR GGGG BBBB, but what's WWWW and TTTT stands for?
I have posted Android source code in App Inventor II format.
If you want, you may download the App from Google Play market
http://stonez56.blogspot.tw/2015/02/arduino-project-android-control-color.html
PIN_BLUE is part of the RGB LED pin, so you should try to give PIN_BLUE value 0 with analogWrite to simulate the pin is off.
Some thing like this:
buttonState == HIGH, then analogWrite(PIN_BLUE, 255);
buttonState == LOW, then analogWrite(PIN_BLUE, 0);
I haven't tested this myself, so please give it a try and let me know if it works.
Stonez
你是用RGB LED嗎? 一開機時要先亮藍色?
請先注意下列事項,先確定都有依照做
1) RGB LED 接法:
注意: 一定要接 Arduino mini pro 有 PWM 的腳位才能控制LED的顏色!
以 Arduino mini pro PWM 腳位只有 : 3, 5, 6, 9, 10, and 11,其它沒有 PWM.
2) 是你用內建的 Pin 13嗎? 那個 pin 腳有內建一個 紅色LED,不能變色。
3) 你要用 analogWrite(PIN_BLUE, 255),不是 digitalWrite
4) Common Anode 接 5V (我買的是共陽的 LED, 所以這支腳要接 5V,若你買的是共陰的 Cathode, 則要接 GND)
5) Because these RGB LED are common anode (Common positive),
//So we need to take 255 to minus R,G,B value to get correct RGB color
analogWrite(PIN_BLUE, (255-B.toInt()));
不好意思,我還沒空試,但是你會不會是把 analogWrite(PIN_BLUE, 255) 放在 loop 裡?所以它就一直亮著? 如果是的話,請把它移到 setup 裡面去。
Hi Pili,
This part of code is looking for characters transmitted from BT and aggregate all characters together into a String. When the last character ")" is read, it means the colour String is completed and program will send this String to Arduino to light up the colour accordingly.
A completed colour String in variable RGB has value likes "255.80.70)" ending character is right parenthesis ")".
To make it easier to understand, I re-arrange the code as below:
while(BT.available() ){
char ReadChar = (char)
BT.read();
// Right parentheses ) indicates complete of the string
if(ReadChar == ')' ){
RGB_Completed = true;
}else{
RGB += ReadChar;
}
}
Hope this is helpful!
Stonez
Yeah, I think you can do the same thing on Arduion Uno.
RX / TX 腳位,我用的是 10, 11, 你只要修改它們成為 0, 1 即可才對。
SoftwareSerial BT(11,12);
改成
SoftwareSerial BT(0, 1);
先這樣試試!
Hi Mike,
1) No, I did not use 220 Omh resistor in my final work and they didn't burn so far.. 🙂
2) https://play.google.com/store/apps/details?id=appinventor.ai_yuanryan_chen.BT_LED Please download this APP to replace the older version APP.
Hi Mike,
I am a beginner in Arduino and it just happened to use P11/P12 as RX/TX. 🙂
Not sure why the App luck up. I definitely tested over few minutes and it was running fine. What phone do you use? I am using HTC One M9.
Yes, I think you can.
Sorry, I don't know how to format the code correctly on BlogSpot.
Please copy the code again and format it correctly. Most of people can get this work without any issues.
Please remove the following lines and the LED should give you the correct color!
//**2014-09-21
//Because these RGB LED are common anode (Common positive)
//So we need to take 255 to minus R,G,B value to get correct RGB color code
analogWrite(PIN_RED, (255-R.toInt()));
analogWrite(PIN_GREEN, (255-G.toInt()));
analogWrite(PIN_BLUE, (255-B.toInt()));
你要做的東西很複雜…已超出我這個教學的範圍。
不過Arduino應該還是能做的到才對。
Usually, this is due to the code somehow messed up when you copied from this page to your editor. Please clean it up by editing them to align and clean up unnecessary parts then it should work.
No, please make this App yourself by refer to the tutorial 2.
Please look at the schematic illustration above and it tells you how are components connected together.
That would be my next project to connect the RGB LED with ESP8226 WiFi module…
I have ordered ESP8226 module and I hope I can make this into a tutorial soon! 🙂
No, I'm having trouble to setup ESP8226 with Arduino…
I will try ESP8226 again in August.
我不會提供 *.aia 檔案喔。
麻煩你自己在 AI2 裡面複制我的貼出來的代碼喔⋯⋯
若不想自己動手,請下載我的 APP 來使用。
不好意思,我沒有用 8051 實作過,沒有辦法幫你。
這樣問很難回答,錯誤訊息是什麼?
Thanks, Eric for helping out people!
You are very welcome, Eric! 🙂
Change the last three lines of code from:
analogWrite(PIN_RED, (255-R.toInt()));
analogWrite(PIN_GREEN, (255-G.toInt()));
analogWrite(PIN_BLUE, (255-B.toInt()));
to:
analogWrite(PIN_RED, R.toInt());
analogWrite(PIN_GREEN, G.toInt());
analogWrite(PIN_BLUE, B.toInt());
It also resolves the color mirroring when you have a common negative RGB LED.
Sorry, please download my App from play store.
Hi there,
That's a good question. Since I never use shift register before, I really don't know if that's possible. I will see if I have time to experience that in the near future.
Here are some discussion to look at: https://forum.arduino.cc/index.php?topic=410613.0
I'm glad my work were appreciated and thanks for your complement! 🙂
請問你要的是什麼閃爍?
讓燈閃爍的功能可以很容易達成喔,只要修改 Arduino 的 code,幾行就能完成。
I didn't use any resistor in my project. However, it is highly recommended to use 220 Omh resistors for this project.
I'm not sure about HC-10 BT module, since I don't have that. However, my phone is UTC U10 and it's Android 7.0. Try to check the wire connection and code again.
I'm glad it worked out for you! 🙂
Please download the App from Android Play Store.
What do you want to do with the motor? Controlling the rotating speed or turn it on/off remotely?
It shouldn't be too difficult to do that with the instruction provided here.
Arduino IDE couldn't find softwareserial.h file in your system.
Please install it first and compile the code again. Check out the official website for more information on softwareserial: https://www.arduino.cc/en/Reference/SoftwareSerial
Arduino IDE couldn't find softwareserial.h file in your system.
Please install it first and compile the code again. Check out the official website for more information on softwareserial: https://www.arduino.cc/en/Reference/SoftwareSerial
I guess you have common negative RGB LEDs…
Change the last three lines of code from:
analogWrite(PIN_RED, (255-R.toInt()));
analogWrite(PIN_GREEN, (255-G.toInt()));
analogWrite(PIN_BLUE, (255-B.toInt()));
to:
analogWrite(PIN_RED, R.toInt());
analogWrite(PIN_GREEN, G.toInt());
analogWrite(PIN_BLUE, B.toInt());
It also resolves the color mirroring when you have a common negative RGB LED.
You will need to external power for those RGB LEDs.
However, this code only give you one color.
Use FastLED can give you animated colors:
Check this out:https://stonez56.blogspot.com/2015/06/
Sorry, please download my App from Play Store or make your own with my tutorial.
Well, if you followed the whole tutorial, this shouldn't happen.
There must be something wrong during the your steps.
Do you want to check if your LED connection and the pin assignment is the same with your code?
Stonez
Glad this article helped! 🙂
May I know what's your project? Do you have a project page?
And your name?